> ## Documentation Index
> Fetch the complete documentation index at: https://docs.scoutos.com/llms.txt
> Use this file to discover all available pages before exploring further.
# Model Management: Control AI Models Across Your Organization
> Enable provider models, set an org-wide default, and restrict agents to approved models in Scout Studio. Org admins control model access for the whole team.
Model Management gives your organization control over which AI models your team can access in Scout Studio. Admins enable models by provider, choose an org-wide default, and keep agents restricted to approved, cost-effective options. These settings apply org-wide and govern which models appear everywhere models are used — including the agent editor.
 ## Where to Find It
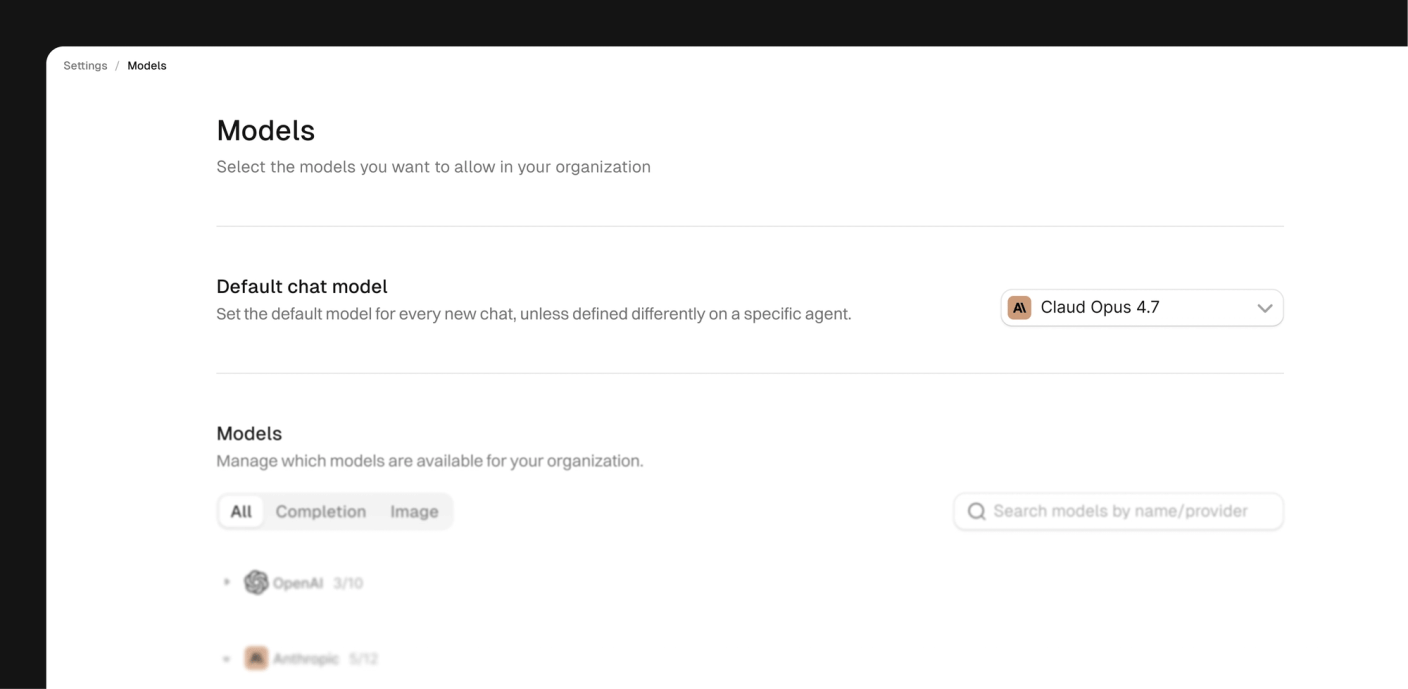
In Scout Studio, open **Settings** in the left sidebar, then choose **Models**.
These settings apply org-wide, and only **org admins** can enable, disable, or change defaults. If you don't see editable controls, ask your org admin to make the change.
## Enabling Models
Models are grouped by provider. Each provider row shows how many of its models are enabled versus the total available (for example, **OpenAI 3/10**).
Navigate to **Settings** → **Models**.
Click a provider to reveal its individual models.
Switch on each model you want available to your team.
To narrow the list, filter by type using the **All**, **Completion**, and **Image** tabs, or search by model name or provider. Enabled models become usable in agents right away.
## Setting a Default Model
The org default is pre-selected for new chats unless an agent overrides it. A cost-efficient model is recommended for the default so everyday usage stays predictable.
Navigate to **Settings** → **Models**.
Under **Default chat model**, open the dropdown.
Choose the model to use as the organization default.
The chosen model pre-fills new chats and serves as the starting option in the agent editor.
## How It Affects Agents
The agent editor's model picker only shows **enabled** models, with the org default pre-selected. Creators can still choose any other enabled option. This lets you:
* Restrict agents to vetted, approved models
* Keep costs predictable by limiting the available choices
* Set an efficient default while keeping powerful models available for specific needs
* Adjust models on existing agents individually or in bulk
## Disabling a Model
When you disable a model that's used by agents or workflows, Scout shows how many items are affected and requires you to choose a replacement before the model can be disabled. Affected agents continue running until a replacement is applied.
## Where to Find It
In Scout Studio, open **Settings** in the left sidebar, then choose **Models**.
These settings apply org-wide, and only **org admins** can enable, disable, or change defaults. If you don't see editable controls, ask your org admin to make the change.
## Enabling Models
Models are grouped by provider. Each provider row shows how many of its models are enabled versus the total available (for example, **OpenAI 3/10**).
Navigate to **Settings** → **Models**.
Click a provider to reveal its individual models.
Switch on each model you want available to your team.
To narrow the list, filter by type using the **All**, **Completion**, and **Image** tabs, or search by model name or provider. Enabled models become usable in agents right away.
## Setting a Default Model
The org default is pre-selected for new chats unless an agent overrides it. A cost-efficient model is recommended for the default so everyday usage stays predictable.
Navigate to **Settings** → **Models**.
Under **Default chat model**, open the dropdown.
Choose the model to use as the organization default.
The chosen model pre-fills new chats and serves as the starting option in the agent editor.
## How It Affects Agents
The agent editor's model picker only shows **enabled** models, with the org default pre-selected. Creators can still choose any other enabled option. This lets you:
* Restrict agents to vetted, approved models
* Keep costs predictable by limiting the available choices
* Set an efficient default while keeping powerful models available for specific needs
* Adjust models on existing agents individually or in bulk
## Disabling a Model
When you disable a model that's used by agents or workflows, Scout shows how many items are affected and requires you to choose a replacement before the model can be disabled. Affected agents continue running until a replacement is applied.
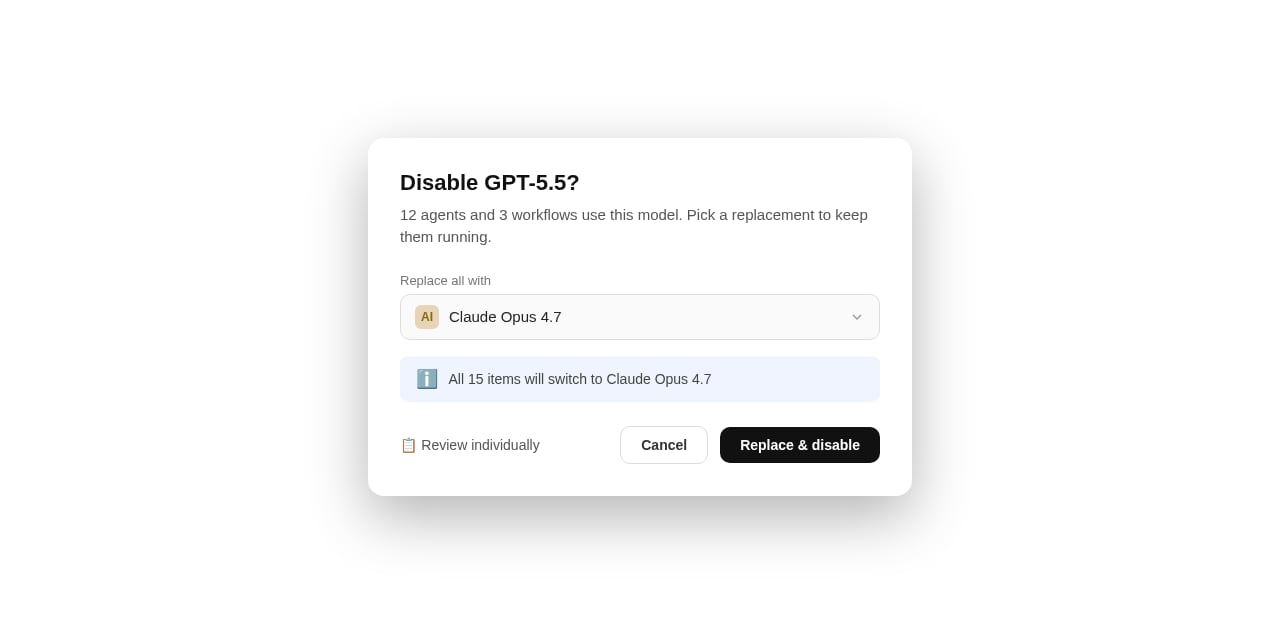 You have two replacement options:
Apply a single replacement model to every affected item, then click **Replace & disable**.
Open a table to assign a different replacement per item, then click **Disable**.
Choosing **Review individually** opens a table listing each affected item with its own replacement dropdown, so you can map different models per agent before disabling.
You have two replacement options:
Apply a single replacement model to every affected item, then click **Replace & disable**.
Open a table to assign a different replacement per item, then click **Disable**.
Choosing **Review individually** opens a table listing each affected item with its own replacement dropdown, so you can map different models per agent before disabling.
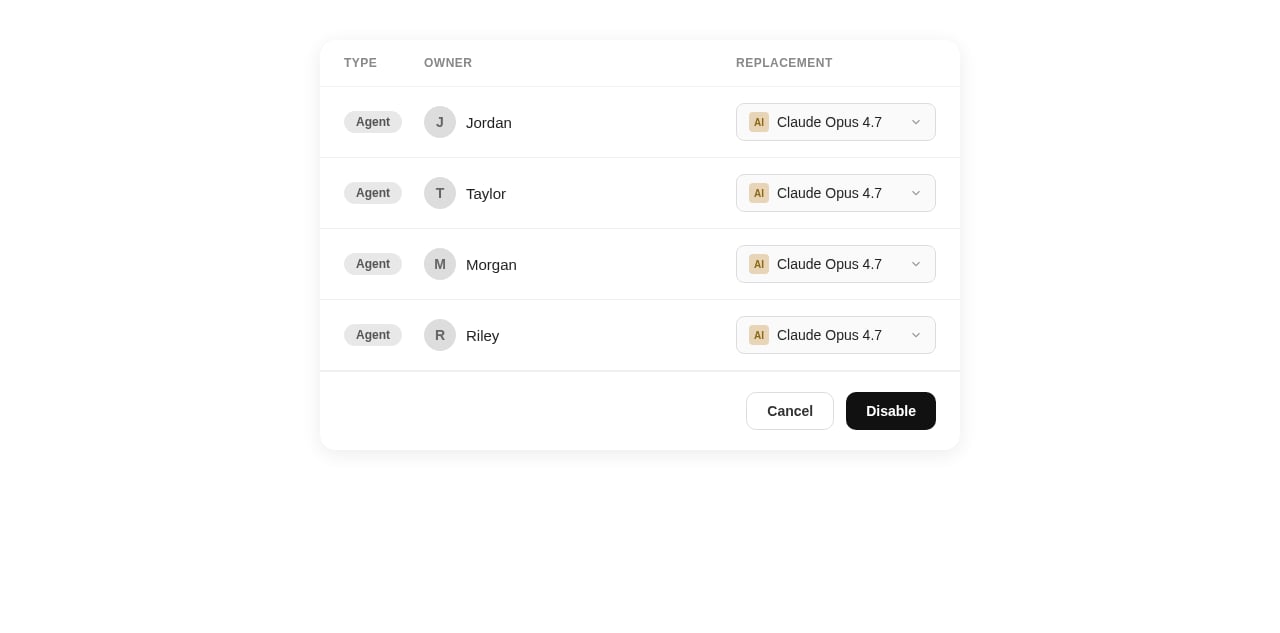 Confirm your replacements before closing the dialog. The model is only disabled once a replacement has been applied to the affected items.
## Troubleshooting
| Issue | Likely cause | Solution |
| ------------------------------------------ | --------------------------------- | --------------------------------------------------- |
| Model not appearing in agent editor | Not enabled for the org | Go to **Settings** → **Models** and toggle it on |
| Cannot change settings | Not an org admin | Ask your org admin to make the change |
| Default model not pre-selected | Browser cache | Hard refresh (`Cmd+Shift+R` / `Ctrl+Shift+R`) |
| Agent using the wrong model after a change | Agent has a pinned model override | Open the agent editor and update the model directly |
## Next Steps
Create and manage credentials to authenticate your Scout integrations.
Build agents that use your approved models in the agent editor.
Confirm your replacements before closing the dialog. The model is only disabled once a replacement has been applied to the affected items.
## Troubleshooting
| Issue | Likely cause | Solution |
| ------------------------------------------ | --------------------------------- | --------------------------------------------------- |
| Model not appearing in agent editor | Not enabled for the org | Go to **Settings** → **Models** and toggle it on |
| Cannot change settings | Not an org admin | Ask your org admin to make the change |
| Default model not pre-selected | Browser cache | Hard refresh (`Cmd+Shift+R` / `Ctrl+Shift+R`) |
| Agent using the wrong model after a change | Agent has a pinned model override | Open the agent editor and update the model directly |
## Next Steps
Create and manage credentials to authenticate your Scout integrations.
Build agents that use your approved models in the agent editor.